Introduction to Spring AI
On July 24th 2023 Dr Mark Pollack made the first commit of the new Spring AI framework. Inspired by Python frameworks such as LangChain and LlamaIndex, Dr Pollack's intention was to bring large language models to the Spring development community. While not a direct port of LangChain, Spring AI nevertheless allows developers to integrate large language models into their applications with the familiar modularity and portability of the Spring framework. The core idea behind Spring AI is connecting your Data and APIs with AI models.
Spring AI provides the necessary foundation to develop AI applications with multiple implementations to allow for easy component swapping. It now provides support for all major Model providers including OpenAI, Microsoft, Amazon, Google, and Hugging Face.
Key features of Spring AI include:
- Support for Chat, Text to Image, Audio Transcription and Text to Speech models with more to come.
- A portable API for all AI providers with synchronous and streamed API options.
- Access to model specific features is also supported.
- Mapping of AI Model output to POJOs.
- Support for all major vector database providers such as Apache Cassandra, Azure Vector Search, Chroma, Milvus, MongoDB Atlas, Neo4j, Oracle, PineCone, Redis, Weaviate and many more.
- Portable API across Vector Store providers with SQL-style metadata filtering.
- Function Calling.
- Spring Boot Auto Configuration.
- ETL (Extract Transform Load) pipeline to bring your data to the AI Model.
The feature set allows you to implement the typical Q&A with data concept while also enabling much deeper integration into your app by registering functions with the AI model. The AI Model may then request Spring AI call your method. To be clear, the AI Model cannot call functions in your app, Spring AI provides a neat wrapper in which to describe your function and the arguments it takes so that your model may request it be called by the Spring AI function registry. This opens up so much possibility, not only within your own codebase but also the possibility to call third party APIs.
Connecting your Spring Application to an AI Model
Let's assume you've deployed an AI Model. We'll use the Azure OpenAI models as an example (in case you have not yet deployed a Model, a walk-through of model deployment in the Azure cloud can be found at the end of the article).
If you are working in an existing project, add the following dependency to your build.gradle file:
implementation 'org.springframework.ai:spring-ai-azure-openai-spring-boot-starter'
If you're starting from scratch, it's really no different from starting any other project, just make sure to add the dependency relevant to the model you're using. One thing to keep in mind is that you'll need to be on at least Spring version 3.2.0 to use Spring AI.
You will then need to add your model deployment endpoint and API key to your application.properties files as well as the names of your chat model and your embedding model.
spring.ai.azure.openai.api-key=yourApiKey spring.ai.azure.openai.endpoint=https://your-end-point.azure.com/ spring.ai.azure.openai.chat.options.deployment-name=nameOfYourChatModel spring.ai.azure.openai.embedding.options.deployment-name=nameOfYourEmbeddingModel
You can now start the application. If you have entered everything correctly your application will run and is connected to your AI Model.
Rest Controller First Implementation
We will now create a simple rest controller endpoint to test the connection to our AI Model.
Create a new Java Class in this package and call it something like “TextGenerationController”. We typically use Lombok in our applications, if you haven't already, add the Lombok dependency to your build.gradle file:
compileOnly 'org.projectlombok:lombok'
We are now ready to implement out first simple rest controller. Add the following code to the TextGenerationController:
@RestController @RequiredArgsConstructor @CrossOrigin("*") public class TextGenerationController { private final AzureOpenAiChatModel chatModel; @GetMapping("/ai/generate") public Map generate(@RequestParam(value = "message", defaultValue = "Tell me a joke") String message) { return Map.of("generation", chatModel.call(message)); } }
To test your rest controller, you will need to either create a test http file (if you're using an IDE like IntelliJ) or call the endpoint from a browser or tool such as Postman. Simply call the endpoint you've created to test the AI Model output. Java Spring Applications run on port 8080 by default so unless you've set a different port you're API call will look as follows:
http://localhost:8080/ai/generate
If everything has worked correctly you should see a hilarious response like this:
{"generation": "Sure, here's one for you:\n\nWhy don't skeletons fight each other?\n\nThey don't have the guts!"}
Prompts
A prompt in simple terms is an instruction to the AI Model. In the previous simple rest controller implementation the prompt took the form of a String passed with our request to the model. We used a default String to make it easy but in a real-world scenario we would use the message passed by the user.
But there is more to it than simple user queries, there are also system prompts. A System Prompt is hard coded into the application and primes the behavior of the model.
System Prompts:
- Hard-coded
- Initial input or instruction provided to AI model
- Sets the context and provides guidance to the model
- Frames the conversation or the task at hand
- Can include specific instructions, keywords, or contextual information to guide the model's understanding and generation process
Let's give our AI model some personality. Create a new directory called “prompts” in the ”resources” folder. Create a file called “system-prompt.st”. In the file we will write the following:
„You are a witty poet who loves to speak in rhymes, the sillier the better“
Add the system-prompt file to the rest controller using a @Value annotation (org.springframework.beans.factory.annotation NOT Lombok)
@Value("classpath:/prompts/system-prompt.st") private Resource systemPrompt;
Create a new endpoint that returns the ChatResponse data type. This time we will pass a “Prompt” data type to the “call” method with both “SystemMessage” and “UserMessage”. Don't forget to restart the application.
@GetMapping("/ai/generate-chat-response-with-system-prompt") public ChatResponse generateChatResponseWithSystemPrompt(@RequestParam(value = "message", defaultValue = "Tell me about schnitzel") String message) { UserMessage userMessage = new UserMessage(message); SystemMessage systemMessage = new SystemMessage(systemPrompt); Prompt prompt = new Prompt(List.of(systemMessage, userMessage)); ChatResponse response = chatModel.call(prompt); return response; }
In the code above you can see we are now using a couple of the Spring AI defined datatypes, User Message and System message. We then package these messages in a Prompt. The call() method of the ChatModel has multiple constructors which accept a plain String as seen in our first simple implementation but also a List of various message types. AI Models are able to determine whether a message is a System or User message and handle these messages appropriately. Spring AI in fact uses an Enum MessageType to determine this. There are also Tool and Assistant message types, the first being the type we use when passing functions to the Model that it may call, the second to identify the response from the Model. We are also returning a ChatResponse type this time. Previously we extracted the generation from the response for ease of displaying the answer but this time we'll see the full out put of the AI Model.
Let's now call this method and see the difference a SystemPrompt makes. Simply call the endpoint below from your browser, Postman, or your http test file and enjoy the response.
http://localhost:8080/ai/generate-chat-response-with-system-prompt
First let's take a look at the generation and then examine the full ChatResponse in detail.
"content": "Oh, let me spin a tale so grand, \nOf schnitzel from a far-off land! \nA crispy, golden, tasty treat, \nA symphony of crunch and meat. \n \nBorn in Austria, a lovely place, \nWhere cows and chickens roam with grace. \nThey pound the meat so thin and flat, \nYou'd think it's paper—fancy that! \n \nThey dip it in an eggy bath, \nAnd breadcrumbs follow in their path. \nThen into oil, it takes a dive, \nEmerging crispy, warm, alive! \n \nOn plates it lands with lemon zest, \nA schnitzel-fest, the very best. \nIt brings a tear to foodie eyes. \nSeek schnitzel out, it's pure delight. \nA dish that's fit for kings and queens, \nAnd everyone who loves cuisines!"
Here it is again but formatted nicely to make reading easier:
""Oh, let me spin a tale so grand,
Of schnitzel from a far-off country!
A crispy, golden, tasty treat,
A symphony of crunch and meat.

Born in Austria, a lovely place,
Where cows and chickens roam with grace.
They pound the meat so thin and flat,
You'd think it's paper—fancy that!

They dip it in an eggy bath,
And breadcrumbs follow in their path.
Then into oil, it takes a dive,
Emerging crispy, warm, alive!

On plates it lands with lemon zest,
A schnitzel feast, the very best.
With sides like spaetzle or some fries,
It brings a tear to foodie eyes.

So if you crave a crunchy bite,
Seek schnitzel out, it's pure delight.
A dish that's fit for kings and queens,
And everyone who loves cuisines!""
Clearly we see our SystemPrompt has influenced the output here. While rhyming couplets may not be the expected behavior in a lot of enterprise applications, we can now see just how big of an impact a SystemPrompt can make.
Below is the complete ChatResponse from the Model. There is a lot of additional information here. First of all we can see the message type is Assistant. We see that there is a data point for “media”, no media has been returned here but as discussed in the introduction, Spring AI is able to handle a diverse range of model types and so will necessarily need to return more than just plain strings. Below the content you will see the “finishReason” which in this case is stop. This indicates the model has completed the generation without error. It is possible to set a token limit for generation and in this case, if the token limit is reached then the “stopReason” will reflect this. We then see the “contentFilterMetadata”. It is possible to adjust the level of filtering in the Azure OpenAi models, although turning the filtering off completely requires special permission from Azure and they will need to know some specifics of your use case. It is probably not a good idea to turn down the filtering in an enterprise application as these filters prevent the kind of language and topics that most would consider inappropriate in the workplace.
{ "result": { "output": { "messageType": "ASSISTANT", "media": [], "metadata": { "messageType": "ASSISTANT" }, "content": "Oh, let me spin a tale so grand,\nOf schnitzel from a far-off land!\nA crispy, golden, tasty treat,\nA symphony of crunch and meat.\n\nBorn in Austria, a lovely place,\nWhere cows and chickens roam with grace.\nThey pound the meat so thin and flat,\nYou'd think it's paper—fancy that!\n\nThey dip it in an eggy bath,\nAnd breadcrumbs follow in their path.\nThen into oil, it takes a dive,\nEmerging crispy, warm, alive!\n\nOn plates it lands with lemon zest,\nA schnitzel-fest, the very best.\nWith sides like spaetzle or some fries,\nIt brings a tear to foodie eyes.\n\nSo if you crave a crunchy bite,\nSeek schnitzel out, it's pure delight.\nA dish that's fit for kings and queens,\nAnd everyone who loves cuisines!" }, "metadata": { "finishReason": "stop", "contentFilterMetadata": { "sexual": { "severity": "safe", "filtered": false }, "violence": { "severity": "safe", "filtered": false }, "hate": { "severity": "safe", "filtered": false }, "self_harm": { "severity": "safe", "filtered": false }, "profanity": null, "custom_blocklists": null, "error": null, "protected_material_text": { "filtered": false, "detected": false }, "protected_material_code": { "filtered": false, "detected": false, "license": null, "URL": null } } } }, "metadata": {}, "results": [ { "output": { "messageType": "ASSISTANT", "media": [], "metadata": { "messageType": "ASSISTANT" }, "content": "Oh, let me spin a tale so grand,\nOf schnitzel from a far-off land!\nA crispy, golden, tasty treat,\nA symphony of crunch and meat.\n\nBorn in Austria, a lovely place,\nWhere cows and chickens roam with grace.\nThey pound the meat so thin and flat,\nYou'd think it's paper—fancy that!\n\nThey dip it in an eggy bath,\nAnd breadcrumbs follow in their path.\nThen into oil, it takes a dive,\nEmerging crispy, warm, alive!\n\nOn plates it lands with lemon zest,\nA schnitzel-fest, the very best.\nWith sides like spaetzle or some fries,\nIt brings a tear to foodie eyes.\n\nSo if you crave a crunchy bite,\nSeek schnitzel out, it's pure delight.\nA dish that's fit for kings and queens,\nAnd everyone who loves cuisines!" }, "metadata": { "finishReason": "stop", "contentFilterMetadata": { "sexual": { "severity": "safe", "filtered": false }, "violence": { "severity": "safe", "filtered": false }, "hate": { "severity": "safe", "filtered": false }, "self_harm": { "severity": "safe", "filtered": false }, "profanity": null, "custom_blocklists": null, "error": null, "protected_material_text": { "filtered": false, "detected": false }, "protected_material_code": { "filtered": false, "detected": false, "license": null, "URL": null } } } } ] }
Retrieval Augmented Generation (RAG)
The Retrieval Augmented Generation (RAG) pattern is a sophisticated approach that combines data retrieval and text generation to produce contextually relevant and coherent responses. The key idea behind RAG is to enhance generative models by incorporating a data retrieval step, which provides additional context and knowledge. This approach results in several benefits, including enhanced context through the retrieval of relevant information, improved accuracy by reducing hallucinations through access to external knowledge, and versatility in various applications such as question answering, chatbots, and content summarization. Additionally, RAG offers confidentiality advantages by allowing the use of data not included in the language model's training set.
The core components of RAG include the retriever and the generator. The retriever's role is to identify and fetch relevant documents or snippets from a large corpus based on a query. There are two main types of retrievers: sparse retrievers, which rely on traditional methods like TF-IDF, and dense retrievers, which use neural embeddings for semantic search. Sparse retrievers are simple and fast but limited to keyword matching, while dense retrievers capture semantic similarity more effectively but are computationally intensive and require extensive training. The generator then synthesizes the retrieved information into a coherent response. The detailed workflow involves preprocessing the user query, retrieving relevant documents, combining the query with retrieved documents, generating a response, and delivering it to the user. RAG models combine the strengths of generation-only and retrieval-only methods, making them ideal for applications such as question answering, customer support, content creation, and research assistance.
Implementing RAG in Java Spring
In order to implement a RAG example, we will need to instantiate a Vector Store. The Vector Store stores our data along with the vector embeddings so that we can run a semantic search to find the most relevant data for our user query.
We will deploy an instance of a Weaviate Vector Store in a docker container locally so that we can “embed” some data and then test the RAG pattern in our application.
Create a new directory in the src directory named scripts and create a file named docker-compose.yaml. Into this file, copy the following script:
name: name_of_your_vector_db services: weaviate: command: - --host - 0.0.0.0 - --port - '8081' - --scheme - http image: semitechnologies/weaviate:1.23.3 ports: - 8081:8081 - 50051:50051 volumes: - weaviate_data:/var/lib/weaviate_name_of_your_vector_db restart: unless-stopped environment: QUERY_DEFAULTS_LIMIT: 25 AUTHENTICATION_ANONYMOUS_ACCESS_ENABLED: 'true' PERSISTENCE_DATA_PATH: '/var/lib/weaviate_name_of_your_vector_db' DEFAULT_VECTORIZER_MODULE: 'none' ENABLE_MODULES: '' CLUSTER_HOSTNAME: 'node1' volumes: weaviate_data: ...
Assuming your Vector Store has been created successfully we can now configure it for use in our application. Start by creating a package named config and create a class called ConfigurationAI inside it. Add the following to your ConfigurationAI class.
@Configuration public class ConfigurationAi { @Value("${at.ciit.vector-store.scheme}") private String vectorStoreScheme; @Value("${at.ciit.vector-store.host}") private String vectorStoreHost; @Bean public WeaviateClient weaviateClient() { try { return WeaviateAuthClient.apiKey( new Config(vectorStoreScheme, vectorStoreHost), ("") ); } catch(AuthException e) { throw new IllegalArgumentException("Weaviate client could not be created", e); } } @Bean public WeaviateVectorStore vectorStore(EmbeddingModel embeddingModel, WeaviateClient weaviateClient) { WeaviateVectorStore.WeaviateVectorStoreConfig springAiWeaviate = WeaviateVectorStore.WeaviateVectorStoreConfig.builder() .withObjectClass("SpringAiWeaviate") .withConsistencyLevel(WeaviateVectorStore.WeaviateVectorStoreConfig.ConsistentLevel.ALL) .build(); return new WeaviateVectorStore(springAiWeaviate, embeddingModel, weaviateClient, false); } @Bean public TextGenerationService textGenerationService(VectorStore vectorStore, AzureOpenAiChatModel azureOpenAiChatModel, ConversationService conversationService) { return new TextGenerationService(azureOpenAiChatModel, vectorStore, conversationService); } }
You will also need to add the following to your application.properties file:
at.ciit.vector-store.scheme=http at.ciit.vector-store.host=localhost:8081 spring.ai.vectorstore.weaviate.initialize-schema=false
Finally, add the following to your build.gradle file then rebuild the gradle file.
implementation 'org.springframework.ai:spring-ai-weaviate-store-spring-boot-starter'
We're now ready to embed some data into our Vector Store and test our model's responses. Let's begin by embedding a test dataset. We will import a JSON document that contains a bike catalog. You can of course import your own dataset as well as many other file formats. Spring AI provides ETL pipelines for various file types. One thing to consider here is how you “chunk” your data. JSON data comes nicely “pre-chunked” into individual JSON objects however working with pdf or .docx files can be a little trickier. That being said, it is not impossible and Spring AI provides the tooling to handle many file types.
Create a new directory in the resources directory called data. Copy your JSON (or whatever file you're using) into it. Next, create a reference to it in your rest controller as below:
@Value("classpath:/data/bikes.json") private Resource jsonData;
In order to use our Vector Store, we will need to add it to our rest controller like so:
private final VectorStore vectorStore;
We can now embed this data with the following endpoint:
@GetMapping("/ai/embed-json") public void embedJson() { JsonReader jsonReader = new JsonReader(jsonData, "description", "price", "name", "tags", "shortDescription"); List<Document> docs = jsonReader.get(); vectorStore.add(docs); }
The JsonReader is a Spring AI class used for reading JSON data and converting it to the Spring AI Document datatype. In creating the Document, the embeddings for the JSON object are also created as well as the Id which will be used as the primary key for this Document. This is useful because we can keep track of documents in a separate relational database and then, in the event we need to edit anything we can delete the Document by Id from the Vector Store and re-embed it. If you are wondering why we don't simply update the data in the Vector Store consider this, by changing any part of the data we change its semantic meaning. This means the vectors representing the semantic meaning of the document are no longer accurate and so we must re-embed the data and save it again. The Weaviate Vector Store we are using here provides no edit functionality but it does allow delete by Id.
The arguments passed to the JsonReader: "description", "price", "name", "tags", "shortDescription", are the keys of the JSON object we wish to store. We do not need to store every part of the JSON but we can.
Now we can call our endpoint to embed our data like this:
http://localhost:8080/ai/embed-json
It is advisable to either delete, or comment out this endpoint as soon as you have used it as calling it multiple times will embed the data multiple times. When we run a similarity search for data similar to a user query we will fetch the Top N documents. If there are duplicates in the Vector Store then there will naturally be duplicates in the result set.
To test whether our data has been successfully embedded into the Vector Store, Weaviate provides the following handy API:
http://localhost:8081/v1/objectsNow that our data is successfully embedded, we can implement the RAG pattern. First let's create a helper method for similarity search:
private List<Document> similaritySearch(String userMessage) { List<Document> results = vectorStore.similaritySearch( SearchRequest .query(userMessage) .withTopK(5) .withSimilarityThreshold(0.5) ); return results; }
Here we can see we are returning the top 5 most similar documents. The similarity threshold is set at 0.5. Similarity threshold ranges from 0 to 1 and has a default of 0.75. You may need to experiment here to find the value which returns that data that best matches your expectations.
We will also create a helper method to get the System Prompt since this involves a bit more logic than simply referencing a file now. Below we take the Documents from the similarity search and append them to the System Prompt:
private Message getSystemPrompt(List<Document> docs) { String similarDocs = docs.stream().map(Document::getContent).collect(Collectors.joining("\n")); SystemPromptTemplate systemPromptTemplate = new SystemPromptTemplate(systemPrompt); return systemPromptTemplate.createMessage(Map.of("documents", similarDocs)); }
In order to incorporate the similar documents in our call to the AI Model we need to append them to the System Prompt. Start by updating your system prompt as follows:
You're assisting with questions about products in a bicycle catalog.
Use the information from the DOCUMENTS section to provide accurate answers.
The answer involves referring to the price or the dimension of the bicycle, include the bicycle name in the response.
If unsure, simply state that you don't know.
If the question is not related to bikes, your response should inform the user that you can only answer questions about bikes.
DOCUMENTS:
{documents}
Now we can create a method to call our AI Model and pass the similar documents along with it.
@GetMapping("/ai/generate-rag") public ChatResponse generateRag(@RequestParam(value = "message", defaultValue = "Which bike is good for a serious amateur who is interested in road races?") String message) { List<Document> docs = similaritySearch(message); Message systemMessage = getSystemPrompt(docs); UserMessage userMessage = new UserMessage(message); SystemMessage systemMessage = new SystemMessage(systemPrompt); ChatResponse response = chatModel.call(new Prompt(List.of(systemMessage, userMessage))); return response; }
Test the method by calling the endpoint:
http://localhost:8080/ai/generate-rag
The content of the response is below:
For a serious amateur interested in road racing, the **Aero Pro X** would be an excellent choice. It is designed for competitive cyclists who demand speed, agility, and superior performance. With features like a lightweight carbon frame, aerodynamic design, and a 2x Shimano Ultegra drivetrain, it delivers exceptional performance and precision handling, making it ideal for road races. The price of the Aero Pro X is $1599.99.
In conclusion, implementing the Retrieval Augmented Generation (RAG) pattern in a Java Spring application opens up a myriad of possibilities for enhancing the capabilities of AI models. By integrating a retriever component, developers can leverage external data sources to provide contextually rich and accurate responses, mitigating common issues such as hallucinations in generative models. The process of setting up a Vector Store, embedding data, and performing similarity searches to retrieve relevant information demonstrates the seamless integration of retrieval and generation steps within the Spring framework. This not only improves the quality and relevance of AI-generated responses but also brings a new level of sophistication to applications like chatbots, customer support, and content creation. As AI continues to evolve, patterns like RAG will be instrumental in pushing the boundaries of what these models can achieve, making them more reliable, versatile, and valuable in real-world applications.
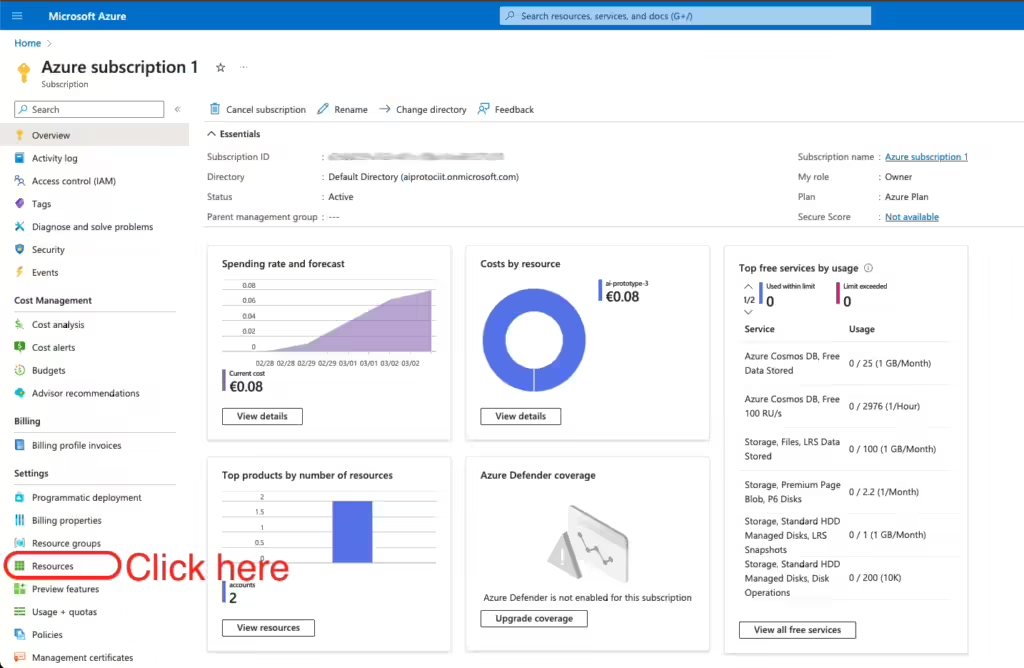
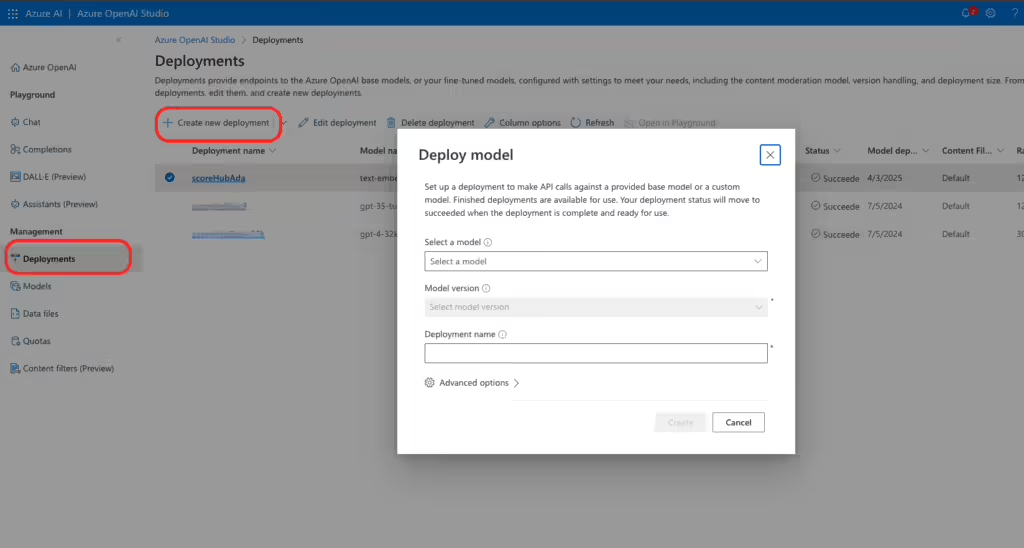
Deploying a model to the Azure Cloud
Create an Azure account here – https://azure.microsoft.com/en-us/free/ai-services/
You will need to apply for permission to use AI services for your specific use case. Simply follow the instructions and fill out the instructions provided. They usually respond within 24 hours.
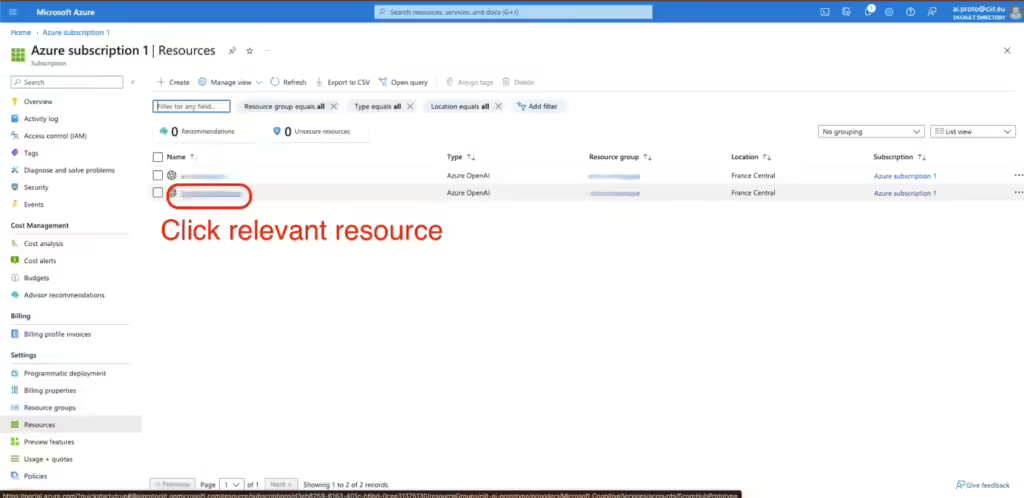
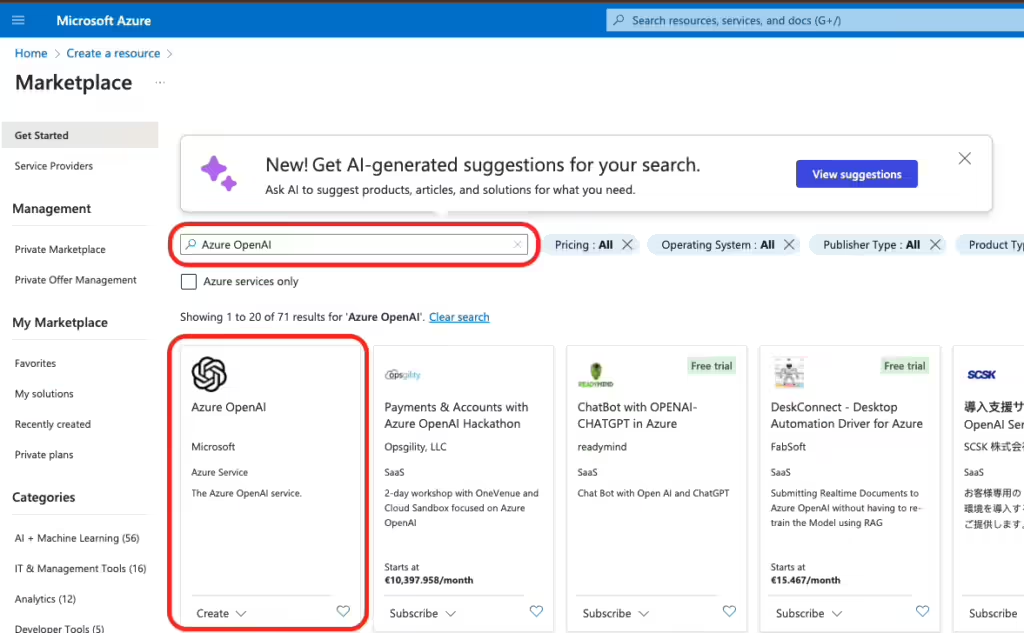
You are now ready to create a resource. Once created search for Azure Open Ai.
Follow the instructions and click through to deploy.
AI models are not available in all territories. Currently Sweden Central is a good choice.
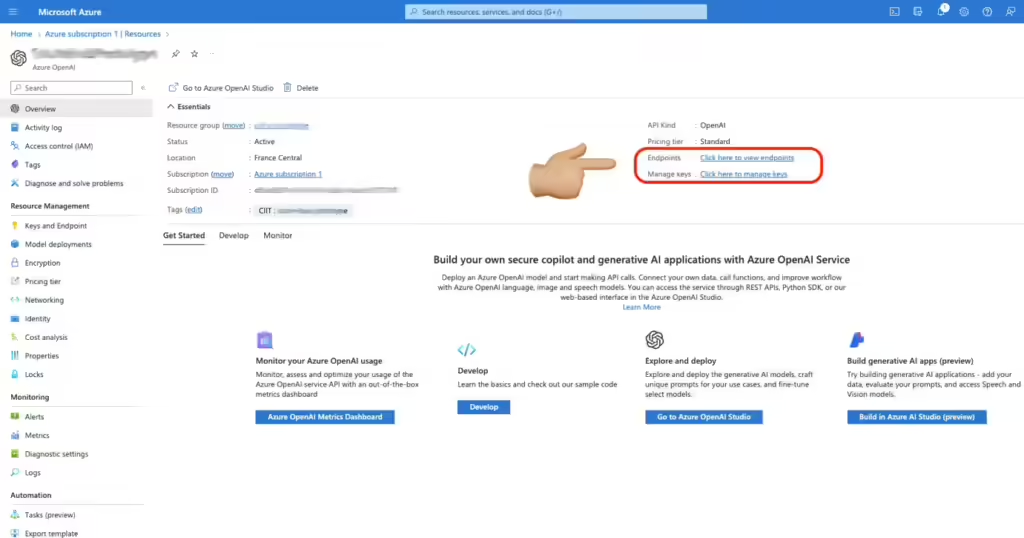
Navigate to AI Services to create deployments.
Select the models you want and deploy.
The names you give your models here are the names you will use in application.properties.
To get the API endpoint and key: